Scrapbooking is a very popular hobby. Many scrapbooking enthusiasts create scrapbooks to document events in the lives of their children, vacations, or other special occasions. Genealogy is a tailor-made subject for scrapbooks. Scrapbooking photographs and other mementoes is an excellent way to preserve family history for generations to come. In addition, it is an attractive way to gather information from records, histories, photographs, and other items essential to preserving family history.
Many scrapbooking companies now create product lines just for family history scrapbooks. Try looking in the scrapbooking section of your local craft store or visit one of the many scrapbooking stores. Some alphabet stickers and stamps have been designed to match antique photographs. Special papers and other embellishments can also be found.
A note about materials: in times past, folks used to tape, glue, or rubber cement photographs into albums. These materials are damaging to photographs. Make sure all paper you use is acid-free and lignin-free so that your photos will not be harmed. Use inks that are acid-free, archive quality. Make sure you use glue that is made for scrapbooking, too. Some glues can harm your photographs. There are a wide variety of archive quality glues available. Your safest bet is to choose all materials from the scrapbooking section of your craft store.
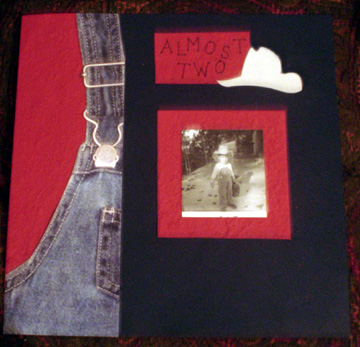
Scrapbook pages generally come in two sizes: 12 x 12 inches or 8½ X 11. I prefer to use 12 x 12 pages, which allow more room for creativity. I have also found a wider selection of papers and scrapbooks available in this size. Papers come in a variety of colors. Family history embellishments are often in sepia tones. I have found that these tones look very nice with sepia photographs. However, you are only limited by your creativity. For example, my husband gave me a picture of himself that his grandmother had labeled “Almost two” on the reverse. This is what I did with the picture:

I found some red paper with an interesting texture for the accents and cut out a four-inch strip to run along the side. I found an embellishment that was literally a photgraph of overalls — it was on photo paper. If I had wanted to get really interesting, I might have been able to find an old pair of the kids’ overalls to cut. I trimmed the parts of the photograph I wouldn’t need. I glued the red paper on top of 12 x 12 navy blue card stock, then glued the overall picture on top of the red paper, aligning the edges. I cut out a “frame for the photograph,” glued the frame to the cardstock, and then glued the photo to the frame. I cut out a small piece of paper and stamped “Almost Two” in dark blue ink. I found a cowboy hat embellishment and glued that near the title of the page. It was one of the first scrapbook pages I did.
If you don’t feel very creative, there are a number of scrapbooking magazines and materials that demonstrate how to create layouts. All you need to do is copy the layout.
Suggestions for inclusion:
- A family tree
- Recipes
- Histories and/or biographies
- Photograph stories
- Birth, death, marriage, and other vital records
- Baptismal, confirmation, bar/bat mitzvah records
It is a good idea to handwrite some of the information in your scrapbook. It lends a personal touch, and the generations that follow may appreciate having an heirloom in your own handwriting.
Here are some more samples from my Family History scrapbook:

For this page, I used archive paper designed to look like an old newspaper, not an actual newspaper. Newspaper is made on low quality paper with low quality ink (which is why it fades and smudges so easily). If you want to save a newspaper article in a scrapbook, I would suggest making sure it doesn’t touch photographs or other mementoes. Be aware that there might not be much you can do to preserve the newpaper’s quality, but you might try techniques mentioned here and here. I glued the picture of my great-grandmother to the paper, then I cut a small piece of brown paper and hand-lettered the words “Glamour Girl,” copying letters from a computer font. Then I hand wrote “Lucille Inez Willis, age 13, 1927.” I glued the brown pieces of paper above and below the photograph.

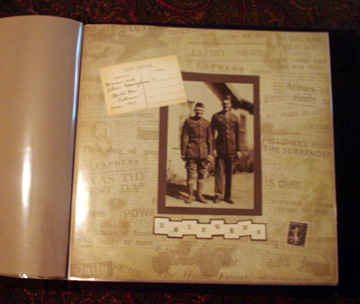
This is a very special picture of my great-grandfather, Herman, and his son (my great-uncle Alvin). Alvin had joined the Army in WWII, and my great-grandfather pulled out his WWI uniform. They posed in their respective uniforms for this picture. You may be able to tell that the background paper I chose for this has a military theme. I used a dark brown card stock for the frame. I cut out the frame and glued the picture to it, then I glued it down on the scrapbook paper. Then I spelled out the word “Uniforms” in old-fashioned alphbet stickers onto a piece of the dark brown card stock. Then I trimmed the card stock around the letters and glued it to the page. For embellishments, I chose a postcard sticker written in French “Carte Postale” and handwrote “Herman and Alvin Cunningham — World War Veterans circa 1941.” I placed the sticker on the page. Finally, I found a sticker of a French stamp and put it near the bottom of the page. I chose the French postcard and stamp because much of both World Wars were fought in France. I do not know that Alvin was in France in WWII, but I know Herman was in WWI.

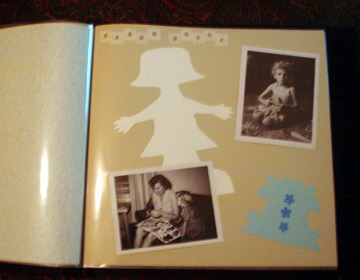
For this page, I found two pictures of my mother and her paper dolls. I created a paper doll out of card stock and made a dress for the doll with a different color and some stickers. I spelled out the words “Paper Dolls” using old-fashioned looking alphabet stickers and placed all the items on the page at angles.

For this page, I created frames out of parchment card stock. I glued the photos to frames and embellished them with button stickers. I spelled out the Jennings name and year in old-fashioned alphabet stickers. I am not certain about this day, by the way; John B. Jennings and Lucinda Fannie Curry married in 1865 and he was killed in 1875. I split the difference. If anyone has a correction for me, don’t hesitate to let me know. It is an easy matter for me to correct the date. Often, scrapbooking stickers are easy to peel off without damaging paper or photos underneath.
Here are some resources for scrapbooking your family history:

 As I promised in my previous post, I will be sharing more about digital storytelling in a future post, but I wanted to share that I have found a family tree sitebuilder I’m excited about. My cousin Rick Zeutenhorst uses it on his site. I really liked the look of my cousin’s site, and based on his recommendation, I decided to get it for two reasons:


